

December 31, 2009

December 22, 2009
Merry Christmas To You
We head out to Grandma and Grandpa's house tomorrow and the excitement level is high!
Mommy's stress level is also VERY HIGH!
As I scramble around the house finishing procrastinated to-do lists I wanted to make sure to wish you all a Merry Christmas.

Wishing you and yours a Holly Jolly Christmas.
See you next week.
December 21, 2009
Photo Collage Using Picnik
I've received many comments and questions about making photo collages and I'm finally going to show you how I do it.
Step 3: Pick the collage you would like to use from the list on the left of the screen. You can change the background color by clicking on the color box also on the left of the screen. Play around with the settings until your happy with the results or just use the presets.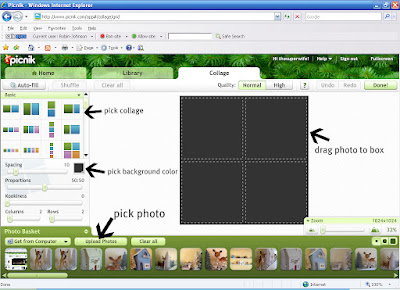 Step 4: Finish your collage by clicking the done button on the top right of the screen.

Step 6: Save your collage. Click the "Save your photo" button at the bottom of the page. Make sure to save it in .jpg.
That's it - so fun and easy. Now you can print them up, use for scrapbooking or for a blog banner.
I use the photo processing site Picnick.com. Picnik has made photo editing so easy and fun it's addicting - and it free. In the past I have used Photoshop CS to edit my photos, but now I only us Picnick, and am very happy with the results.
Here's how you do it.
Step 1: Go to Picnick.com
Step 2: Upload and edit photos if you would like. Then click "Collage" on the home page.
Step 3: Pick the collage you would like to use from the list on the left of the screen. You can change the background color by clicking on the color box also on the left of the screen. Play around with the settings until your happy with the results or just use the presets.
Next add photos: At the bottom of the page you'll see a green folder labeled "Photo Basket". From here you can upload your edited photos', upload additional photos from your computer, or look in your history for previously used photos.
Click and hold the left mouse key on the photo you want to use and drag the photo into the box you want to place it in. Then let go of the mouse key. Your photo will pop into the box. Repeat steps until all your boxes are filled. Reposition photos' within your boxes by clicking on them and moving them up, down or side to side.
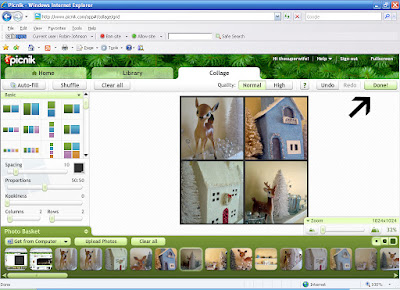
Step 4: Finish your collage by clicking the done button on the top right of the screen. Step 5: Add text, stickers, etc. by Clicking on the "Create" tab. When your finished, click the "Save and Share" tab in the upper right corner.
Step 6: Save your collage. Click the "Save your photo" button at the bottom of the page. Make sure to save it in .jpg.
That's it - so fun and easy. Now you can print them up, use for scrapbooking or for a blog banner.
December 18, 2009
Reindeer
 I've had so many nice comments on the adorable reindeer I used for my banner that I thought I would show you the rest of my collection.
I inherited the reindeer from mygrandmother and each year I am reminded of her as I lovely arrange them. They are one of my prized possessions, they so darn cute how could they not be!
This year I arranged them on my picture ledge in the dinning room, surrounded by a few glitter houses, mercury glass votives, white berries garland that I cut up to fit and bottle brush trees. I think it turned out beautiful and unfortunately, looks much better in person then in my photo's.

December 17, 2009
Vintage Finds
This past weekend I found the time to stop by Antiques Minnesota and found some adorable items. Here's what I found and what I did with them.
First I found a few cute little postcards.
 Added them to a couple frames to display in the bathroom.
 Next I picked up a box of adorable Christmas cards. Isn't the box super sweet!
  Framed up three of my favorites and hung them in the living room.
Also found a couple silver items. Just love them.

A red covered book.
 And two adorable bottlebrush wreaths.
December 15, 2009
Got Glitter?
You Betcha!
I've been glittering up a storm to finish a few more homemade glitter house. Using cereal boxes, glue gun, and lots of glitter I have two more to show off. 


Linked upt to DIY Day at A Soft Place to Land.
December 14, 2009
A Dusting of Christmas Cheer
This past weekend I finished decorating the house for Christmas. Here are photos of Christmas Cheer spread around the house. 
In the kitchen:

 In the bedroom:


December 10, 2009
Homemade Glitter House
For the past three years I have been fascinated with glitter houses. This year I picked up a couple at Target and that got me thinking I should try making my own. After doing a little research online I found a few patterns and went to work.
Would you like to see my first creation?
I tell you, it was really easy, so easy in fact I have four others in the various stages which I hope to finish in the next couple days. I'm completely obsessed, it's just so darn FUN!
Here's how I did it.
Found a pattern here, enlarged it to 150%, cut it out and then traced it onto cardboard. For cardboard I use cereal boxes and for the base I picked up canvas covered chipboard at Micheals. 
Cut out all the pieces with a Xacto knife.

Using my glue gun, I glued it all together and this is how it looked.  Then I painted it.
 Then the fun part began. Glittering and fake snow. So much fun!
Then I painted it.Then the fun part began. Glittering and fake snow. So much fun! Here's another view of the finished house.
 The kids even got in on the action. Here's little Ms. Z's creation. How sweet!
If you have never made one, I high recommend you start saving cereal boxes, get yourself some glitter and give it a try - you won't regret it.
Linking up to Transformation Thrusdays at The Shabby Chic Cottage
December 9, 2009
Christmas Red
For may years red has been my go-to color for Christmas decorating. Lately I seem to be moving toward simmering colors of silver and crystal, however red still holds a special place in my heart.
Here are a few of the reds I have scattered around my home for Christmas. 
December 4, 2009
A Couldn't Help Myself

I'm so very, very naughty. . .
but I just had to go to Target and pick myself up another adorable glitter house. I added a few bottle brush trees around to keep it company. She now sits happily in the living room hutch making me smile each time I walk by.
A New Banner
This morning found me immersed in a marathon of picture taking and what better way to show off a few of my favorite images than making a collage.
Hope you enjoy.
Dear Santa
Dear Santa,
The past year I have been on my very best behavior and I am hoping you can make my wishes come true.
You see, I have a lovely home that I adore with all my heart. Its a bright and cheerful place that I happily spend my days puttering around changing this and moving that, attempting to make it more cozy and inviting.
My wish list, dear Santa, is not for me but for my little home. I would love to be able to replace five items, and I'm hoping you will lend a helping hand.
1. Entryway Lighting: See the ugly brass and glass contraption? Pretty is definitely NOT how I would describe it. I dream of a oil rubbed bronze lantern hanging cheerfully above our heads casting a warm glow of light.
2. Bathroom Lighting: Oh My! is all I can think of before my mind freezes from the horror of it. Anything, and I mean anything would be better than this.
3. Kitchen Flooring: Cracking and permanently stained a smeared mud color the room could surly benefit from a covering of glossy wood planks.
4. Kitchen Cabinets: Although sturdy and functional, their finish is beginning to crack and the color make my skin start to crawl just a bit if I look too long. I would be forever grateful to have some elves stop by to help me paint them a beautiful creamy white.
5. Bedroom Ceiling Fan: I adore this ceiling fans function and have been blessed to own it on many a hot summer evenings. Unfortunately it is incredibly ugly and would love to replace it with a sleek shiny model.
So if you find you have a little time on your hands and are looking for a little to keep your hands busy, please consider my wish list.
Respectfully Yours,
Robin
December 3, 2009
Window Glitz
Giving my windows some Christmas glitz is one of my favorite things to do while decorating my home.
It's simple and easy and I love how glamorous it makes the whole room feel.
Using beaded gardland, ribbon and a few glittered ornaments I drapped and wrapped them unto my curtain rod to create this glitz delight. 
Sorry the photo is so horrible I can't seem to get around the glare, here's a side view. 
And of course I had to give the dinning room window a little glitz also. 
So if your looking to add a little sparkle to your room give this a try - it's fun and easy.
Until tomorrow. Robin

December 1, 2009
Can You Feel It?
A tingle of anticipation . . .
A giggle of excitement. . .
The Christmas Season is upon us.
Go dig out all that glitters and sparkles;
snuggle up to the ones you love;
and By Golly have a Holly Jolly Christmas Season!
Subscribe to:
Posts (Atom)