
Last week I finished this project because I've been living without a headboard for three years . . .


Today I thought I give you all a quick how-to so you can make your own!
You will need . . .
one 1X10(faceboard)
one 1X6 (top #1)
one 1X8 (top #2)
three shelf supports
wood screws
finish nails
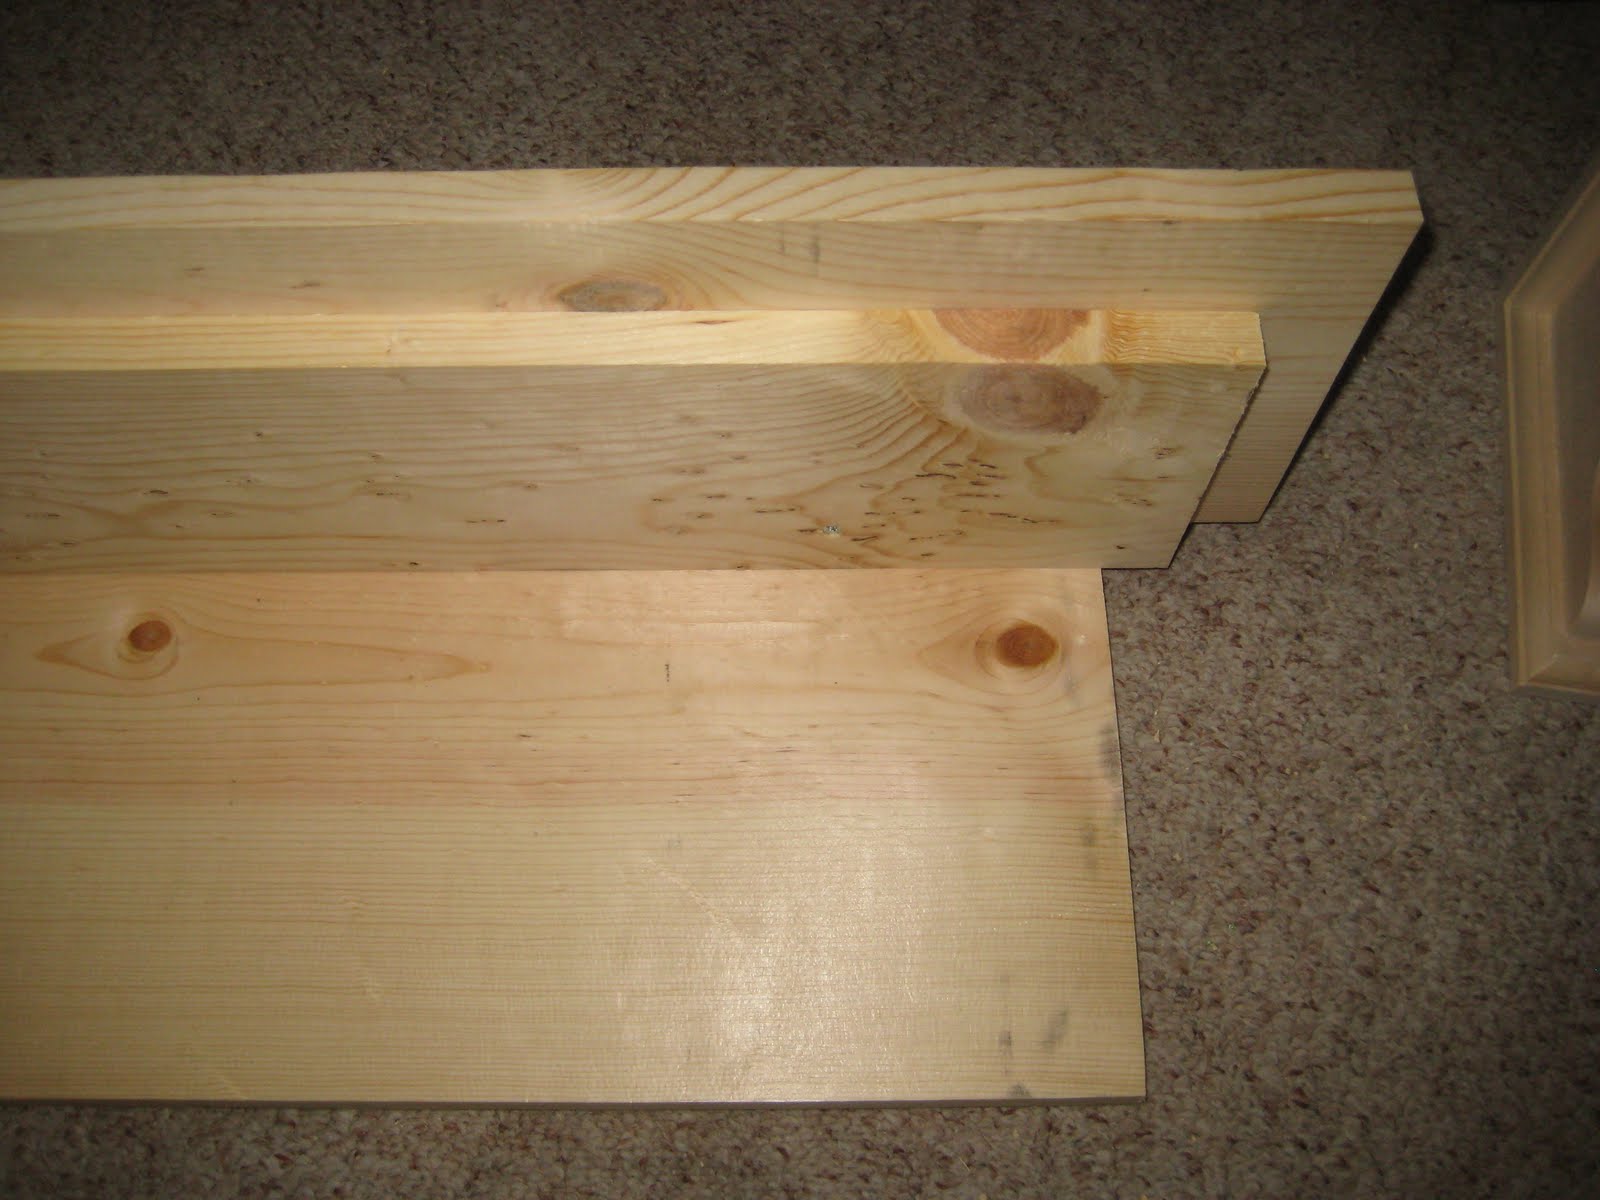
Step One: Cut the boards to length.
I cut the faceboard to the length I wanted for a king size bed. Top #1 I cut 1" shorter than the faceboard. Top #2 I cut shorter than the faceboard by 1 1/2". This gave me the tired look I was going for.

Step Two: Attach top #1 and top #2 together.
(I predrilled all the holes as I went along - not sure if it was needed though)


Step Three: Attach top boards to faceboard

Here's the view from the back

Step Four: Find bracket placement and attach.
Mark the middle of the shelf and attach bracket, both from the top and the back.

Here's how it look with one bracket attached.

Look I have a helper!

Here's how it looks with all three brackets attached. Starting to look like a shelf!
Step Five: Cut and attach moulding.
I used this mounding for the space between top#1 and top#2

Cutting it to length and attaching with brad nails this is how it looks.

Here's another view.

Next I added the moulding onto the two faceboard sections between the shelf brackets. I used a small half round moulding.
First draw lines where you would like to place the moulding. Next measure and cut the moulding making sure to give each section a mitered corner.
Attach once again using brad nails and it should look like this.
(next time I think I would just glue the sections on instead of nailing)

For the top shelf edge I used a large half round, once again mitering the corners and attaching with brad nails.

Here she is all built - Yippeee!

Step Six: Paint and hang.
I used a black satin paint and distressed the edges a bit.
Finished product...
She turned out great don't you think? If you'd like to take a look at my original post visit here.


Great tutorial and the shelf looks fabulous. I love it. Hugs, Marty
ReplyDeletejoni to my website in here rajawaliqq
DeleteWell...with help anyone can do it!!!! LOL!!! Love your shelf, very professional girl and you make it sound so easy!!!...that's because it's a great tutorial! Thank you for sharing!!!
ReplyDeleteThat's so beautiful! Great job!
ReplyDeletesuchakingdom.blogspot.com
oh man - this is going straight on my husbands desk We've never had a headboard! Thanks!
ReplyDeleteI am so impressed! This turned out wonderful!!! Your sweet helper is adorable:)
ReplyDeleteIt looks amazing - and thanks for the great step by step instructions! I just love it - I am thinking about where I can put one!
ReplyDeleteChelsea
Love this!! Thanks for sharing!
ReplyDeleteLooks SO beautiful!
ReplyDeleteJust found this from 320 Sycamore and I LOVE it!! Such a pretty and sweet idea!!
ReplyDeleteElise
It looks beautiful!
ReplyDeleteI Love this shelf and had to make it for myself. (Well my dad did it with his tools). But he did find your measurements were backwards. In step one, the 1st board is not shorter but 1 inch longer and the 2nd board is 1 1/2 inch longer instead of shorter. Thanks again for the tutorial. Just what I was looking for, but thought I would tell you incase someone wanted to make it.
ReplyDeleteAmy
This turned out great! You made it look so easy.. hah.
ReplyDeleteIt looks great! The best part is that you put it all together yourself. That's wonderful! BTW, I like your little helper. :)
ReplyDeleteCame across your shelf on Pintrest this evening and I LOVE IT - Going to buy my wood tomorrow - just wondering how you attached it to the wall?
ReplyDeleteThanks for the super tutorial!!
Sandra in Ohio
So pretty!!! I might do this if I can't find an affordable bed frame on craigslist. We just bought a king bed. I have a question though... Do you know the name of your wall color? Its such a perfect shade. Sandjwestern @ gmail dot com. Thanks!!
ReplyDeleteLove your project! I just wanted to let you know that I featured it today on my blog Sew Rockin'. You can check it out at: http://www.sewrockin.com/2011/12/09/you-sew-rock-me-fridays-8/
ReplyDeleteAwesome job, I can't wait to see what else you come up with!
Jamie
I love, love, love your headboard and it looks gorgeous in black! I have this linked to my headboards post too today, for inspiration!
ReplyDeleteBeautiful headboard idea! I can't wait to start working on mine!
ReplyDeleteOne question though... how did you hang it on the wall? I want to make sure its secure enough that the weight of the shelf and object on it won't fall or tilt.
Thanks!
This is fantastic! I've been looking everywhere for a tutorial on how to make one of these, thanks for the inspiration.
ReplyDeletei'd also love to know how you hung it on the wall.... i made a similar shelf and can't figure out how to hang it.
ReplyDeleteThis comment has been removed by the author.
ReplyDeleteHow much did the overall project cost? How did you hang it on your wall? Great idea and beautiful!
ReplyDeleteI sharing your blog with others...great stuff!
ReplyDeleteI have a shelf similar to this that I've had for two years & can't figure out how to hang it! Help! What did you use to secure it to the wall so it is sturdy & won't fall. Thanks!
ReplyDeleteHow much did this cost to make
ReplyDeleteI love this shelf, I want them all over my house now :o) I knows its late...but were there answers to the above? thanks!! :o)
ReplyDeleteHi there-- nice headboard... but my eye is caught on your bedding.. where did you get those pillow cases? thanks
ReplyDeleteThis comment has been removed by a blog administrator.
ReplyDeleteThis comment has been removed by a blog administrator.
DeleteThis comment has been removed by a blog administrator.
ReplyDeleteThis comment has been removed by a blog administrator.
ReplyDeleteMy son in law made this shelf for me, I LOVE it. It was a challenge figuring out how to hang it as it is quite heavy. My son ended up drilling holes into the back board and screwing it to the wall, countersinking the screws. I then filled the holes and painted over them. If you look really closely you can see where the holes are but this is a good thing as I will want to take it with me if I ever move!
ReplyDeleteThis comment has been removed by a blog administrator.
ReplyDeleteThis comment has been removed by a blog administrator.
ReplyDeleteThis comment has been removed by a blog administrator.
ReplyDeleteشركة نقل اثاث
ReplyDeleteشركة شراء اثاث مستعمل بالرياض
شراء اثاث مستعمل حائل
الاثاث من الاشياء التى نستطيع ان نبذل فية الكثير من الجهد والوقت من اجل ان يتم القيام باعمال النقل من مكان الى اخر سواء الى اى مكان فى المملكة او اى مكان خارج المملكة ، فاعمال النقل من الخدمات التى تبدو لنا انها سهلة وبسيطة الا انة فى نهاية الامر من الخدمات التى تؤدى الى التعرض الى مشاكل كثيرا من الصعب ان يتم القيام بحلها من الكسر والخدش والتلفيات والضياع ،شركة قمم التميز من اهم وافضل الشركات التى تحقق اعلى مستوى من خدمات النقل للاثاث والقيام بالاتفاق مع مركز التعاون الخليجى من اجل ان يتم الحفاظ على الاثاث ضد اى مشكلة ، فاذا كنت فى حيرة من امر النقل فتاكد انك الان تمتلك افضل الشركات المميزة الخاصة باعمال النقل من خلال الاعتماد على توفير عدد من الخدمات المميزة . شراء الاثاث المستعمل بحائل
شركة قمم التميز على وعى كبير باعمال النقل والتى تحقق افضل مستوى من خدمات النقل التى تؤكد ان الاثاث يتم الانتقال من مكان الى اخر دون ان يتم التعرض الى اى مشكلة من اهم الخدمات المقدمة الاتى :- شراء اثاث مستعمل بحائل
1- التعبئة تتم من خلال صناديق مخصصة مغلقة حتى يتم انتقال بيه الى المكان المراد النقل الية .
لا تكتفى شركة نقل اثاث بالقيام باعمال النقل فقط بل تهتم باعمال التركيب واعادة الاثاث الى ما كان علية بعد ان تتم اعمال النقل مباشرا . محلات شراء الاثاث المستعمل بحائل
شركة تخزين اثاث
تخزين الاثاث من المهام التى نجتاج الية فى اوقات معينة اثناء الانتقال من شقة الى اخر او القيام بالسفر لفترات طويلة ، فالحرارة المرتفعة والرطوبة والاتربة الناعمة تؤدى الى ظهور التشققات و تؤدى الى التكسير المفاجىء للاخشاب ، فاذا كنت فى حيرة من اعمال النقل فتعاون مع شركة المتخصصة فى اعمال التخزين من الامور التى لابد من القيام بية بطريقة مميزة على ايدى متخصصين فى القيام بهذة الخدمة .
ارقام شراء الاثاث المستعمل بحائل
شركة قمم التميز من اهم الشركات التى تقوم بانشاء مستودعات طبقا لمعاير ذات جودة مميزة والتى تساعد فى الحفاظ على الاثاث ضد اى عيوب او اى مشكلات
ارقام محلات شراء الاثاث المستعمل بحائل
شركة شراء اثاث مستعمل بحائل
تظهر مع مرور مدة التخزين بالاضافة الى ان المستودعات مقسمة من الداخل الى اماكن مخصصه للزجاج واماكن مخصصة للاخشاب وهكذا حتى يتم الحفاظ على الاثاث فعليك ان تتعاون وتتواصل مع الارقام المتواجدة على الصفحة من اجل ان تتم الحفاظ على الاثاث ضد اى تغيرات من الممكن ان تحدث ، بالاضافة الى اننا نقدم عقود مميزة فى اعمال التخزين فى مقابل ارخص الاسعار .
Do you remember how much this project cost for the materials?
ReplyDeletewonderful blog
ReplyDeleteReally beautyful Article. Keep up See more Recumbent vs. Upright
ReplyDeleteThanks for sharing such useful information about headboards. I think this is really a very nice post. Thanks for the great content!
ReplyDeleteTreasure Box
This can not be said of the tropical home stylistic theme line. The costs are truly sensible and can without much of a stretch be fit into the financial plan of most that are keen on this style. Used Furniture
ReplyDeleteThe blog delineates how hard the author has taken a shot at this.
ReplyDeleteEngineered Flooring
This is the fitting blog for anybody who desires to find out about this topic. You notice a lot its nearly onerous to argue with you (not that I truly would want…HaHa). You undoubtedly put a brand new spin on a subject thats been written about for years. Nice stuff, simply great! company website
ReplyDeleteYou must indulge in a contest for one of the greatest blogs over the internet. Ill suggest this web site! my company
ReplyDeleteHello… DropshipDragon provides dropping for quality, affordable products direct from China to your customers. Perfect for eBay sellers and website owners alike!… Discover More Here
ReplyDeleteYou have noted terribly attention-grabbing points ! ps good net site here. check here
ReplyDeleteThanks for a very interesting blog. What else may I get that kind of info written in such a perfect approach? I’ve a undertaking that I am simply now operating on, and I have been at the look out for such info. home accessories
ReplyDeleteI really appreciate the kind of topics you post here. Thanks for sharing us a great information that is actually helpful. Good day!
ReplyDeleteplumbing southend
This comment has been removed by the author.
ReplyDeleteNow that’s what I call a tremendous blog. Beautifully written.
ReplyDeletesouthend builders
agen bola
ReplyDeletepoker online
poker uang asli
jasa seo indonesia
dominoqq
bandarqq
poker qq online
pkv games
prediksi bola
jadwal bola
agen bola
TOGEL212
ReplyDeleteagen togel212
alamat togel212
alternatif togel212
angka jitu hk togel212
angka jitu togel212
angka main hk togel212
TOGEL ONLINE
jayatogel
togel online
togel singapore online
togel online terpercaya
daftar togel online
togel online sgp
jaya togel keluaran hongkong
jaya togel sdy
bandar togel online
situs togel online
togel online org
nomor hongkong togel online
togel online deposit 50000
pengeluaran togel online
aplikasi togel online
online togel
judi togel online
BERKAH365
Berkah 365
liga Berkah365
link alternatif Berkah365
live chat Berkah365
Berkah365 seo
Berkah365 asia
login Berkah365
Link Alternatif VirtusPLay
ReplyDeleteLink Alternatif NegaraQQ Terbaru
Link Alternatif PanenPoker Terbaru 2020
Link Alternatif JudiSakti
PLease visit and leave comment, bandar situs togel resmi terbesar dan sangat populer sejak tahun 2001. Menyediakan data tabel shio togel 2020 terlengkap dan paling akurat dipencarian google dan wikipedia.
ReplyDeletesebagai togel online yang terpercaya kami menyediakan beberapa pasaran yang algi ramai di mainkan di bidang pertogelan yaitu togel sydney| togel singapore| PCSO lottery| togel hongkong dan masuh banyak lagi pasaran lain nya yang tidak kalah menariknya
ReplyDeleteCROWNQQ I AGEN BANDARQ I BANDARQ ONLINE I ADUQ ONLINE I DOMINOQQ TERBAIK
ReplyDeleteYuk Buruan ikutan bermain di website CrownQQ
Sekarang CROWNQQ Memiliki Game terbaru Dan Ternama loh...
9 permainan :
=> Poker
=> Bandar Poker
=> Domino99
=> BandarQ
=> AduQ
=> Sakong
=> Capsa Susun
=> Bandar 66
=> Perang Baccarat (NEW GAME)
=> Bonus Refferal 20%
=> Bonus Turn Over 0,5%
=> Minimal Depo 20.000
=> Minimal WD 20.000
=> 100% Member Asli
=> Pelayanan DP & WD 24 jam
=> Livechat Kami 24 Jam Online
=> Bisa Dimainkan Di Hp Android0619679319
=> Di Layani Dengan 5 Bank Terbaik
=> 1 User ID 9 Permainan Menarik
=> Tersedia Deposit Via Pulsa XL & Telkomsel
Ayo gabung sekarang juga hanya dengan
mengklick CrownQQ
Link Resmi CrownQQ:
ratuajaib.com
ratuajaib.net
ratuajaib.info
BACA JUGA BLOGSPORT KAMI:
Agen BandarQ Terbaik
Winner CrownQQ
Daftar CrownQQ
Agen Poker Online
Info Lebih lanjut Kunjungi :
WHATSAPP : +855882357563
Line : CS CROWNQQ
Facebook : CrownQQ Official
AGENS128 Adalah Situs Judi Online Taruhan Sepak Bola, Casino, Sabung Ayam, Tangkas, Togel & Poker Terpopuler di Indonesia
ReplyDeletePasang Taruhan Online Melalui Agen Judi Terpercaya Indonesia Agens128, Proses Cepat, Banyak Bonus, Online 24 Jam dan Pasti Bayar!
Sabung ayam
sbobet online
casino online
tembak ikan
daftar bisa langsung ke:
LINE : agens1288
WhatsApp : 085222555128
PERMAINAN CASINO GD88
ReplyDeleteMemahami Cara Bermain Baccarat
Situs Judi Slot Indonesia Yang Dipercaya
Informasi dan Tips Slot Online
Situs Judi Slot Terpercaya
Cara Mendaftar Akun Untuk Bermain Judi Game Slot
Semua Situs Slot MPO
Situs MPO Slot Terbaru
Sejarah Permainan Poker Online
ReplyDeleteSitus Game Poker Online
Keamanan Bermain Poker Online
Situs Poker Indonesia Terbaik
Link Alternatif Poker Terbaik
Bandar Poker Online Indonesia
Raja Judi Poker Dunia
Judi Poker Uang Asli
Bermain Judi Domino Online
Spesial Promo Khusus Member Setia Di Situs CrownQQ
ReplyDeleteYuk Buruan Daftar Dan Mainkan 9 Game Berkualitas Hanya Di Situs CrownQQ
Agen BandarQ Terbesar Dan Terpercaya Di indonesia
Rasakan Sensasi serunya bermain di CrownQQ, Agen BandarQ Yang 100% Gampang Menang
Games Yang di Hadirkan CrownQQ :
* Poker Online
* BandarQ
* Domino99
* Bandar Sakong
* Sakong
* Bandar66
* AduQ
* Sakong
* Perang Baccarat (New Game)
Promo Yang Hadir Di CrownQQ Saat ini Adalah :
=> Bonus Refferal 20%
=> Bonus Turn Over 0,5%
=> Minimal Depo 20.000
=> Minimal WD 20.000
=> 100% Member Asli
=> Pelayanan DP & WD 24 jam
=> Livechat Kami 24 Jam Online
=> Bisa Dimainkan Di Hp Android
=> Di Layani Dengan 5 Bank Terbaik
<< Contact_us >>
WHATSAPP : +855882357563
LINE : CS CROWNQQ
TELEGRAM : +855882357563
Link Resmi CrownQQ:
RATUAJAIB. COM
RATUAJAIB.NET
RATUAJAIB.INFO
DEPOSIT VIA PULSA TELKOMSEL | XL 24 JAM NONSTOP
CROWNQQ | AGEN BANDARQ | ADUQ ONLINE | DOMINOQQ TERBAIK | DOMINO99 ONLINE TERBESAR
togel online
ReplyDeletebandar togel terpercaya
agen togel
judi togel
Website paling ternama dan paling terpercaya di Asia ^^
ReplyDeleteSistem pelayanan 24 Jam Non-Stop bersama dengan CS Berpengalaman respon tercepat :)
Memiliki 9 Jenis game yang sangat digemari oleh seluruh peminat poker / domino
Contact Us
Website SahabatQQ
WA 1 : +855972076840
WA 2 : +855887159498
LINE : SAHABATQQ
FACEBOOK : SahabatQQ Reborn
TWITTER : SahabatQQ
Blog :
* Cerita Seks
* Artikel Seks
* Artikel Poker
* Dunia Travel
* Majalah Kesehatan
* Film & Movie Online
Daftar SahabatQQ
Nice article
ReplyDeleteIm very support the owner
Agen Domino99
SahabatQQ
Kabar Paito
ReplyDeleteAlternative :
www.jayaslot4d1.top
Berita :
https://www.kabarpaito.site
https://www.slotpulsamurah.online
judi deposit pulsa
agen slot deposit pulsa
bandar togel terbaik
casino online terbaik
deposit via pulsa
jayaslot4d
judi deposit pulsa
situs judi terpercaya
bandar togel terbaik
slot deposit pulsa
togel deposit pulsa
togel hongkong
Kabar Paito
EBOBET- EBOBET Situs Daftar Slot Online Terbaik dan Terpercaya 2020
ReplyDeleteTersedia Beragam Jenis Permainan Terbaik dan Terpopuler di Indonesia
SPORTSBOOK - LIVE CASINO - IDN POKER - SLOT GAMES - TEMBAK IKAN
PROMO BONUS MENARIK TERBANYAK BULAN JUNI 2020 :
- BONUS DEPOSIT HARIAN SLOT GAME 10%
- BONUS BULANAN BERHADIAH UANG TUNAI RATUSAN JUTA RUPIAH
- BONUS NEW MEMBER SPORTSBOOK 100%
- BONUS NEW MEMBER SLOT 100%
- BONUS NEW MEMBER 20 %
- BONUS ROLLINGAN LIVE CASINO 1%
- BONUS CASHBACK SPORTSBOOK 10%
- BONUS TURNOVER 0,5%
- BONUS REFERRA 15%
TERSEDIA BERAGAM SISTEM DEPOSIT TERLENGKAP :
BCA - MANDIRI - BRI - BNI - PULSA ( TELKOMSEL - XL ) - OVO
Minimal Deposit Rp.10.000,- dan Withdraw Rp.20.000,-
Hubungi Kami :
WHATSAPP : +855967598801
LINE : ebobet
Daftar Slot Online
Agen Slot Deposit Pulsa
Situs Slot Terpercaya
Agen Slot Online
BandarQ Situs Poker QQ
ReplyDeletewww.wargapoker.io
AYo Bremain Bersama Kami hanya di www.mariobola,info
ReplyDeleteHOT PROMO :
- Bonus Deposit Setiap Hari 10% (max 100 Rb) Minimal TO 2x
- Bonus Cashback Mingguan Di Sportbook 5% - 15%
- Bonus Refrensi Mingguan Di Permainan Sportbook 2,5%
- Bonus Rollingan Mingguan Sportbook Refferal 0,1%
- Bonus Rollingan Casino 0.8%
Mainkan Dan Dapatkan BOnus nya sekarang juga
kami menyediakan berbagai jenis Games , seperti :
-Sport
- Tangkas
-Togel
- Live Casino
- Poker
- Slot
- Sabung Ayam
- Tembak Ikan
Kami tunggu kedatangannya dan Join bersama kami .
WEBSITE www.mariobola(dot)info
WA Untuk Pendaftaran ya bosku ^^
083161896684
ReplyDeleteVIPADUQ,Adalah Situs Agen Judi Poker DominoQQ BandarQ Online Terbesar di Indonesia Hadir Untuk Anda Semua Dengan Games dan Bonus Yang Menarik!Dan Pelayanan Yang 24Jam Selalu Online Untuk Melayani Anda dengan Senang Hati Kami Juga Menerima Deposit Dari Segala Jenis Bank, Link Aja, Ovo, Go-pay, Dana
Bonus yang diberikan Poker VIPADUQ Setiap Hari Minggu :
* Minimal Depo 15.000
* Minimal WD 20.00
* Deposit dan Withdraw 24 jam Non stop ( Kecuali Bank offline / gangguan )
* Bonus rollingan 0.5%
* Bonus Refferal 10% + 10%,seumur hidup
* Bonus Jackpot, yang dapat anda dapatkan dengan mudah Seperi :
- POKER
- DOMINOQQ
- CAPSA SUSUN
- BANDAR POKER
- ADUQ
- BANDARQQ
- BANDAR66
- SAKONG
- NEW GAME **PERANG BACCARAT**
Menangkan Hadiah - Hadiahnya Setiap Harinya !!!
Info Lebih lanjut bisa menghubungi kami melalui :
- Wa : +6287785609038
- SKYPE : VIPADUQ
- LINE : VIPADUQ
- WECHAT: VIPADUQ
* https://DAFTAR/
* https://Vip-aduq.xyz/
* https://pusattogel365.blogspot.com/
* http://elisacarista.over-blog.com/
If you are looking for a very cheap Animal Crossing Bells store, then I recommend you to https://www.acbellsbuy.com/, there is a 24/7 online service, immediate delivery
ReplyDeletepoker online
ReplyDeletepoker online
poker online
poker online
poker online
poker online
ReplyDeletepoker online
poker online
poker online
poker online
poker online
ReplyDeletepoker online
poker online
poker online
poker online
poker online
ReplyDeletepoker online
poker online
poker online
poker online
ReplyDeleteMainALienBola88.com Adalah daftar situs bola88 terbaik saat ini yang merupakan salah satu elmatador nya website bola88, agen bola88, situs bola88, bandar bola88 terpercaya & terbaik Saat ini.
MAINALIENBOLA88
SITUS BOLA88
SLOT ONLINE
POKER88
ALIENBOLA
WEBSITE BOLA88
AGEN BOLA88
LINK BOLA88
DAFTAR BOLA88
BANDAR BOLA88
DAFTAR AGEN BOLA88
DAFTAR SITUS BOLA88
DAFTAR BANDAR BOLA88
DAFTAR WEBSITE BOLA88
DAFTAR LINK BOLA88
AGEN SLOT
BANDAR SLOT
AGEN IDN SPORT
BANDAR IDN SPORT
AGEN IDN POKER
BANDAR IDN POKER
AGEN IDN POKER88
Ayo Bermain Dan Bergabung Bersama Mario Bola
ReplyDeleteTersedia Bonus Menarik Di setiap hari dan Setiap Minggu nya ^^
Promo Yang berlaku Di www.mariobola(dot)info :
HOT PROMO :
- Bonus Deposit Pertama Setiap Hari 10% (Max Bonus 200ribu) Minimal TO 3x
-Bonus Deposit Ke Dua Setiap Hari 5% ( Max Bonus 200 RB ) To 3x
- Bonus Cashback Mingguan Di Sportbook 5% - 15% (Minimal Kekalahan 250ribu)
- Bonus Refrensi Mingguan Di Permainan Sportbook 2,5%
- Bonus Refferal Mingguan Di Permainan Slot & Casino 2.5%
- Bonus Rollingan Mingguan Sportbook Refferal 0,1%
- Bonus Cashback Slot Mingguan 5% (Minimal Kekalahan 500Ribu)
- Bonus Rollingan Poker 0.2%
- Bonus Rollingan Casino 0.8% ( WM & 885Crown ) ( GD88 Otomatis masuk ketika betting )
Bisa Deposit Via Pulsa Telkomsel & XL
Menang Berapapun Dibayarkan !!
Buktikan kemenanganmu Sendiri sekarang juga !!
Hanya di www.mariobola(dot)info
Info pendaftaran
whatsapp :+6283161896684
47EBB0 << Daftar Pakai Refferal Hoki juga bosku ^^
Ayo Bermain Dan Bergabung Bersama Mario Bola
ReplyDeleteTersedia Bonus Menarik Di setiap hari dan Setiap Minggu nya ^^
Promo Yang berlaku Di www.mariobola(dot)info :
HOT PROMO :
- Bonus Deposit Pertama Setiap Hari 10% (Max Bonus 200ribu) Minimal TO 3x
- Bonus Cashback Mingguan Di Sportbook 5% - 15% (Minimal Kekalahan 250ribu)
- Bonus Refrensi Mingguan Di Permainan Sportbook 2,5%
- Bonus Refferal Mingguan Di Permainan Slot & Casino 2.5%
- Bonus Rollingan Mingguan Sportbook Refferal 0,1%
- Bonus Cashback Slot Mingguan 5% (Minimal Kekalahan 500Ribu)
- Bonus Rollingan Poker 0.2%
- Bonus Rollingan Casino 0.8% ( WM & 885Crown ) ( GD88 Otomatis masuk ketika betting )
Bisa Deposit Via Pulsa Telkomsel & XL
Menang Berapapun Dibayarkan !!
Buktikan kemenanganmu Sendiri sekarang juga !!
Hanya di www.mariobola(dot)info
Info pendaftaran
whatsapp :+6283161896684
47EBB0 << Daftar Pakai Refferal Hoki juga bosku ^^
FULL JADWAL BOLA DINI HARI NANTI !
ReplyDeleteJangan Ketinggalan Pasang Taruhan Kamu Disini Ndan!
Modal Hanya 50rb Sudah Bisa Bertaruh & Menang
..
Bandar Taruhan BOLA Online Terpercaya !!
- Cashback SPORTBOOK Up to 15%
- Refferal 2.5% Seumur Hidup
- Transaksi Cepat 24 Jam Nonstop
- Menerima Deposit Dari Seluruh Bank Indonesia
- Terima Deposit Via Pulsa Telkomsel & XL
- Menerima Gopay,DANA,OVO
- Menang Berapapun Pasti Bayar
..
🔘Kunjungi Website: WWW•PELANGISBO•INFO
🔘Whatsapp : +6281333472723
Ayo Bermain Dan Bergabung Bersama Mario Bola
ReplyDeleteTersedia Bonus Menarik Di setiap hari dan Setiap Minggu nya ^^
Promo Yang berlaku Di www.mariobola(dot)info :
HOT PROMO :
- Bonus Deposit Pertama Setiap Hari 10% (Max Bonus 200ribu) Minimal TO 3x
- Bonus Cashback Mingguan Di Sportbook 5% - 15% (Minimal Kekalahan 250ribu)
- Bonus Refrensi Mingguan Di Permainan Sportbook 2,5%
- Bonus Refferal Mingguan Di Permainan Slot & Casino 2.5%
- Bonus Rollingan Mingguan Sportbook Refferal 0,1%
- Bonus Cashback Slot Mingguan 5% (Minimal Kekalahan 500Ribu)
- Bonus Rollingan Poker 0.2%
- Bonus Rollingan Casino 0.8% ( WM & 885Crown ) ( GD88 Otomatis masuk ketika betting )
Bisa Deposit Via Pulsa Telkomsel & XL
Menang Berapapun Dibayarkan !!
Buktikan kemenanganmu Sendiri sekarang juga !!
Hanya di www.mariobola(dot)info
Info pendaftaran
whatsapp :+6283161896684
47EBB0 << Daftar Pakai Refferal Hoki juga bosku ^^
Gabung Bersama kami di Betpulsa,net
ReplyDeleteDaftar di Betpulsa,net Dan mainkan Ratusan Game Dalam 1ID
Situs Paling Terpercaya Betpulsa
Menangkan Bonus Jutaan Rupiah Setiap Harinya
Jaminan Kemenangan Bergaransi.
AYO SEGERA BERGABUNG DAN BUKTIKAN SENDIRI
Games Yang Tersedia Antara Lain :
* SPORTSBOOK
* POKER
* LIVE CASINO
* IDN LIVE
* BLACK JACK
* SLOT ONLINE
* SABUNG AYAM S128
Promo di Betpulsa :
* Min Depo 25 K
* Min WD - 50 K
* Bonus New Member 15%
* Next Deposit 10%
* Bonus Harian 5%
* Bonus Naik Level
Dan Masih Banyak Bonus Lainnya.
* Deposit Via Pulsa Tanpa Potongan Rate 100%
* Deposit dan Withdraw 24 jam Non stop tanpa kendala
* Proses Deposit & Withdraw Tercepat
* Jaminan Jackpot 100% Dan Mudah Cair
* Livechat 24 Jam Online
* Segera Bergabung Di Betpulsa,net
* Untuk Info Lebih Lanjut Bisa Hubungi CS Kami
## Contact_us ##
WHATSAPP : 0822 7636 3934
Thanks for the tips. I really like this Website, it give so much information.
ReplyDelete^_^
Dnapoker
Daftar Dnapoker
Login Dnapoker
Lapak Promosi
Dnatoto
Link Dnapoker
Link Alternatif
Link Alternatif Dnapoker
Situs Poker Online
Situs Poker Online Indonesia
Judi Online
Judi Online Indonesia
Game Online
Game Online Indonesia
Game Online Terbaik 2020
Agen Poker
Agen Poker Resmi
Agen Poker Online
Agen Poker Terbaik
Agen Poker Indonesia
Agen Poker Terpercaya
Agen IDN Poker Indonesia
Agen IDN Poker Terpercaya
Bonus New Member
Bonus Deposit
IDN Poker
IDN Poker Indonesia
Freechips
Ayo Bermain Dan Bergabung Bersama Mario Bola
ReplyDeleteTersedia Bonus Menarik Di setiap hari dan Setiap Minggu nya ^^
Promo Yang berlaku Di www.mariobola(dot)info :
HOT PROMO :
- Bonus Deposit Pertama Setiap Hari 10% (Max Bonus 200ribu) Minimal TO 3x
- Bonus Cashback Mingguan Di Sportbook 5% - 15% (Minimal Kekalahan 250ribu)
- Bonus Refrensi Mingguan Di Permainan Sportbook 2,5%
- Bonus Refferal Mingguan Di Permainan Slot & Casino 2.5%
- Bonus Rollingan Mingguan Sportbook Refferal 0,1%
- Bonus Cashback Slot Mingguan 5% (Minimal Kekalahan 500Ribu)
- Bonus Rollingan Poker 0.2%
- Bonus Rollingan Casino 0.8% ( WM & 885Crown ) ( GD88 Otomatis masuk ketika betting )
Bisa Deposit Via Pulsa Telkomsel & XL
Menang Berapapun Dibayarkan !!
Buktikan kemenanganmu Sendiri sekarang juga !!
Hanya di www.mariobola(dot)info
Info pendaftaran
whatsapp :+6283161896684
ReplyDeleteDAFTAR DISINI : BANDAR JUDI ONLINE
Ayo buruann , mana tau kamu menjadi jutawan setelah bergabung dengan kami ..
--> Group FB PREDIKSI BOLA JITU SUMOBOLA https://www.facebook.com/groups/sumbola/
--> Instagram https://www.instagram.com/sumobolacs/
#SUMOBOLA #SUMOBOLALOUNGE #BONUSDEPOSIT #DEPOSITPULSA #EVENTPARLAY
komen fb
Yuk Gabung sekarang dan menangkan jutaan rupiahnya Bersama kami :)
Daftarkan Sekarang Juga!!
Tunggu apalagi jadi kan smartphone kalian sebagai mesin pengahasil uang!! ^_^ ^_^
Whatsapp : +855968658892
IG: SUMOBOLACS
FB : PREDIKSIBOLAJITUSUMOBOLA
Ayo Bermain Dan Bergabung Bersama Mario Bola
ReplyDeleteTersedia Bonus Menarik Di setiap hari dan Setiap Minggu nya ^^
Promo Yang berlaku Di www.mariobola(dot)info :
HOT PROMO :
- Bonus Deposit Pertama Setiap Hari 10% (Max Bonus 200ribu) Minimal TO 3x
- Bonus Cashback Mingguan Di Sportbook 5% - 15% (Minimal Kekalahan 250ribu)
- Bonus Refrensi Mingguan Di Permainan Sportbook 2,5%
- Bonus Refferal Mingguan Di Permainan Slot & Casino 2.5%
- Bonus Rollingan Mingguan Sportbook Refferal 0,1%
- Bonus Cashback Slot Mingguan 5% (Minimal Kekalahan 500Ribu)
- Bonus Rollingan Poker 0.2%
- Bonus Rollingan Casino 0.8% ( WM & 885Crown ) ( GD88 Otomatis masuk ketika betting )
Bisa Deposit Via Pulsa Telkomsel & XL
Menang Berapapun Dibayarkan !!
Buktikan kemenanganmu Sendiri sekarang juga !!
Hanya di www.mariobola(dot)info
Info pendaftaran
whatsapp :+6283161896684
imopoker
ReplyDeleteimopoker
imopoker
imopoker
imopoker
imopoker
Link alternatif imopoker
imopoker
Bandar Poker IDN
judi poker
ReplyDeleteASUSPOKER
ASUS POKER
ASUSPOKER
DEPOSIT OVO
DEPOSIT PULSA
DEPOSIT GOPAY
TEXAS POKER ONLINE
CEME KELILING ONLINE
DOMINO BET ONLINE
BANDAR CEME ONLINE
BANDAR BLACKJACK ONLINE
BANDAR CAPSA ONLINE
SUPER 10 ONLINE
SUPER TEN ONLINE
OMAHA ONLINE
AGEN JUDI POKER ONLINE
DAFTAR SITUS POKER ONLINE
POKER ONLINE UANG ASLI
POKER ONLINE INDONESIA
POKER ONLINE TERPERCAYA
SITUS JUDI ONLINE TERBAIK
BONUS NEW MEMBER 50%
BONUS NEXT DEPOSIT 10%
BONUS PROMO IDN POKER TERBESAR
BONUS PROMO TERBESAR IDN POKER
DAFTAR SITUS POKER TERBAIK 2020
ASUS POKER
ReplyDeleteASUSPOKER
LIVECHAT ASUSPOKER
DEPOSIT OVO
DEPOSIT PULSA
DEPOSIT GOPAY
TEXAS POKER ONLINE
CEME KELILING ONLINE
DOMINO BET ONLINE
BANDAR CEME ONLINE
BANDAR BLACKJACK ONLINE
BANDAR CAPSA ONLINE
SUPER 10 ONLINE
SUPER TEN ONLINE
OMAHA ONLINE
AGEN JUDI POKER ONLINE
DAFTAR SITUS POKER ONLINE
POKER ONLINE UANG ASLI
POKER ONLINE INDONESIA
POKER ONLINE TERPERCAYA
SITUS JUDI ONLINE TERBAIK
BONUS NEW MEMBER 50%
BONUS NEXT DEPOSIT 10%
BONUS PROMO IDN POKER TERBESAR
BONUS PROMO TERBESAR IDN POKER
DAFTAR SITUS POKER TERBAIK 2020
Ayo Bermain Dan Bergabung Bersama Mario Bola
ReplyDeleteTersedia Bonus Menarik Di setiap hari dan Setiap Minggu nya ^^
BANDAR BOLA JALAN
Tempat Daftar
Whatsapp
Prediksi Bola
Youtube Channel
Promo Yang berlaku Di www.mariobola(dot)info :
HOT PROMO :
- Bonus Deposit Pertama Setiap Hari 10% (Max Bonus 200ribu) Minimal TO 3x
- Bonus Cashback Mingguan Di Sportbook 5% - 15% (Minimal Kekalahan 250ribu)
- Bonus Refrensi Mingguan Di Permainan Sportbook 2,5%
- Bonus Refferal Mingguan Di Permainan Slot & Casino 2.5%
- Bonus Rollingan Mingguan Sportbook Refferal 0,1%
- Bonus Cashback Slot Mingguan 5% (Minimal Kekalahan 500Ribu)
- Bonus Rollingan Poker 0.2%
- Bonus Rollingan Casino 0.8% ( WM & 885Crown ) ( GD88 Otomatis masuk ketika betting )
Bisa Deposit Via Pulsa Telkomsel & XL
Menang Berapapun Dibayarkan !!
Buktikan kemenanganmu Sendiri sekarang juga !!
Hanya di www.mariobola(dot)info
Info pendaftaran
whatsapp :+6283161896684
bermain lah dan dapatkan bonus besar nya hingga jutaan rupiah di bandarqq, dominoqq terbaik saat ini http://202.95.10.87/app/Default0.aspx?lang=id
ReplyDeletekami siap membantu anda dalam memenangkan permainan bandarqq, dominoqq di website kami https://dominoqqme.com/
ReplyDeleteI like this post, thank your for sharing:
ReplyDeletehttps://webmediacenter.com
Nice blog, i am also work on this type of blog
ReplyDeleteBet online Poker
Bet on sports online with a wide range of bet types and competitive betting odds! Get your welcome bonus and place your bets on Football, Basketball, Cricket and more. Sign up now and win real prizes on Live Casino and Slots games!
Situs Domino99
ReplyDeleteAgen Domino
Situs Agen Poker PKV
Situs PKV Terpercaya
Boshepoker
Agen Judi Online
Poker
bandarq
aduq
sakong
domino99
capsa susun
bandar poker
bandar66
perang baccarat
Situs Agen Judi PKV
jihan0824
ReplyDeletehttps://www.bbc.co.uk/news/uk-england-20109311
ReplyDeletehttps://www.bbc.com/news/uk-england-20109311
https://www.bbc.co.uk/programmes/b045z8wl
https://www.bbc.com/programmes/b045z8wl
http://news.bbc.co.uk/2/hi/uk_news/england/coventry_warwickshire/7597621.stm
http://news.bbc.co.uk/2/hi/school_report/9168397.stm
http://news.bbc.co.uk/2/hi/school_report/8565519.stm
http://news.bbc.co.uk/2/hi/school_report/8565519.stm
https://www.theguardian.com/culture/tvandradioblog/2007/nov/23/lastnightstvarrangemeama
https://www.theguardian.com/stage/2011/jul/08/turn-of-the-screw-review
Barakcasino, Agen Judi Casino Online Dengan Ratting Kemenangan Tertinggi.
ReplyDelete#LIGAUTAMA #LIGAUTAMALOUNGE #MIXPARLAY #BONUSDEPOSIT #PREDIKSIPARLAY #BERITABOLA #LINKALTERNATIF #BANDARBOLA
ReplyDeleteDaftar Website Judi Online Dengan Bonus Terbesar
MENERIMA DEPOSIT VIA PULSA , DANA , OVO , GOPAY , BRILINK.
DAFTAR SEKARANG : https://utamasbobet.info/
Hanya disini bisa deposit pada saat bank OFFLINE
* Menggunakan sistem yang aman tetapi tidak meribetkan pemain
* Minimal Deposit dan Withdraw kita hanya 50.000 saja loh
* Bank yang tersedia di LIGAHOBI :
BCA | Mandiri | BNI | BRI | Danamon | CIMB Niaga
TESTIMONI : http://www.ligautamalounge.com/
DAFTAR SEKARANG : https://utamasbobet.info/_View/Register.aspx
Whatsapp : +855 16 32 6756
- Cashback Up To 15%
- Bonus Refferal Seumur Hidup
- Bonus Deposit Perdana New Member 15%
- Bonus Deposit 10% Setiap Hari Bebas Klaim
- Bonus Rollingan Casino 0,8% Seminggu Sekali
- Bonus Cashback SLOT & TANGKAS Seminggu Sekali Hingga 15%
- Dapatkan panduan bermain terbaik bersama kami
DAFTAR SEKARANG : https://www.juraganparlay.org?ref=9DEE9C
susah cari bandar slot online terpercaya? kunjungi kami di baginda4d. bandar slot online terpercaya dengan rating kemenangan tinggi http://139.180.184.251/
ReplyDeleteManilabet365 merupakan situs Judi Bola88 Online Uang Asli dan Deposit Pulsa Paling Hoki.
ReplyDeleteBuruan Daftar Disini >>> Judi Bola88
Judi Bola88 : situs Judi Bola88 Online
Link Alternatif : situs Judi Slot Online
MANILABET365 - SITUS JUDI BOLA88 | PRAGMATIC SLOT ONLINE TERKINI, TERBAIK DAN TERPERCAYA DI INDONESIA
Join US ! klik link di bawah ini :
--> Situs Judi Bola88 Online
--> situs Judi Bola88 Online
--> situs Judi Slot Online
Untuk Info Dan Bonus Menariknya Bisa Hubungi Kami Di Bawah Ini :
Whatsapp : +62-821-6348-3281
DAFTAR DISINI : Situs JDB Slot Online
Ayo buruann , mana tau kamu menjadi jutawan setelah bergabung dengan kami ..
--> situs Judi Bola88 Online
--> situs Judi Bola88 Online
cara menang Judi
ReplyDeletelogin darumabet
daftar darumabet
situs judi terlengkap
situs judi rekomendasi
bonus 200%
situs mewahbet
daftar mewahbet
Situs Judi Slot Online
mewahbet
Medan88 Rent Car memiliki website resmi untuk mempermudah anda booking secara online rental mobil medan anda di situs https://medan88rentcar.id/
ReplyDeletegarudagame
ReplyDeletegarudagame
slot online
garudagame
garudagame
You Have Nice Contents
ReplyDelete"Come to my website to view the contents of my website"
SUMOBOLA - SITUS MAIN GAME ONLINE TERBESAR DI INDONESIA HANYA DENGAN 1 USER ID SUDAH BISA BERMAIN SEMUA GAME. Join US ! klik link di bawah ini ?
DAFTAR DISINI ---> WWW.SUMOBOLA.COM <---
--> BERITA PREDIKSI BOLA
--> ALTERNATIF DEPOSIT
--> BONUS DEPOSIT
--> WEBSITE TERPERCAYA
Untuk Info Dan Bonus Menariknya Bisa Hubungi Kami Di Bawah Ini :
Whattsap : +855 968658892
DAFTAR DISINI : BANDAR JUDI ONLINE
Ayo buruann , mana tau kamu menjadi jutawan setelah bergabung dengan kami ..
--> Group FB PREDIKSI BOLA JITU SUMOBOLA https://www.facebook.com/groups/sumbola/
--> Instagram https://www.instagram.com/sumobolacs/
#SUMOBOLA #SUMOBOLALOUNGE #BONUSDEPOSIT #DEPOSITPULSA #EVENTPARLAY
Dewacinta
ReplyDeleteDewa
Cinta
agen togel
bandar togel
togel online
aman terpercaya
bandar online
buku mimpi
daftar togel online
Togel Singapore
Togel Hongkong
Togel Sydney
Keluaran Togel
Paito Togel
DewacintaQQ
Poker Indonesia
Poker Online Indonesia
Bandar QQ
Agen Ceme Online
Daftar Situs Poker
Poker Online Terpercaya
Judi Poker
Poker Online Uang Asli
Poker Uang Asli
Situs Poker Online
Agen Poker
Poker88
Domino QQ Kiu Kiu
Capsa Susun Online
Poker99
saya sangat mengerti jika anda menyukai game bandarqq dan disini saya juga suka dengan permainan ini
ReplyDeletejika anda mencari yang terbaik disini tempat nya
bandarqq
Ingin Mencari Bandar Betting Terpercaya ?
ReplyDeleteBuruan daftarkan diri anda sekarang juga bersama kami di www,utamasport,org ( koma nya di ganti titik )
Hanya bersama kami tingkat kemenagan rate tertinggi se indonesia dengan tingkat kemenangan 90%
Promo Yang Berlaku Di LIGA UTAMA
HOT PROMO :
- Bonus New Member 15%
- Bonus Deposit Harian Pertama 10% (MAX Bonus 100ribu) Minimal TO 2x
- Bonus Cashback Mingguan Di Sportbook 5% - 15%
- Bonus Cashback Mingguan Di Slot Up to 15%
- Bonus Refrensi 2,5% Seumur Hidup Di Permainan Sportbook
- Bonus Rollingan Mingguan Sportbook Refferal 0,1%
- Bonus Rollingan Casino 0.8%
- Bonus Rollingan Poker 0.2%
Ayo Bermain Dan Bergabung Bersama Mario Bola
ReplyDeleteTersedia Bonus Menarik Di setiap hari dan Setiap Minggu nya ^^
Promo Yang berlaku Di www.mariobola(dot)info :
HOT PROMO :
- Bonus Deposit Pertama Setiap Hari 10% (Max Bonus 200ribu) Minimal TO 3x
- Bonus Cashback Mingguan Di Sportbook 5% - 15% (Minimal Kekalahan 250ribu)
- Bonus Refrensi Mingguan Di Permainan Sportbook 2,5%
- Bonus Refferal Mingguan Di Permainan Slot & Casino 2.5%
- Bonus Rollingan Mingguan Sportbook Refferal 0,1%
- Bonus Cashback Slot Mingguan 5% (Minimal Kekalahan 500Ribu)
- Bonus Rollingan Poker 0.2%
kami menyediakan berbagai jenis Games , seperti :
- Sport
- Tangkas
- Togel
- Live Casino
- Poker
- Slot
- Sabung Ayam
- Tembak Ikan
Kami tunggu kedatangannya dan Join bersama kami .
Bisa Deposit Via Pulsa Telkomsel
Menang Berapapun Dibayarkan !!
Buktikan kemenanganmu Sendiri sekarang juga !!
Hanya di www.mariobola(dot)info
Info pendaftaran
whatsapp :
WA 1 : +6282 1325 72756
WA 2 : +62822 4569 1339
Daftar Online Terbaik
ReplyDeleteDAFTAR SEKARANG : WWW(.)bolapalapa(.)NET
BANDAR BOLA PALAPA BOLA
MENERIMA DEPOSIT VIA PULSA , DANA , OVO , GOPAY , BRILINK.
Hanya disini bisa deposit pada saat bank OFFLINE
* Menggunakan sistem yang aman tetapi tidak meribetkan pemain
* Minimal Deposit kita hanya 20.000 saja loh
* Bank yang tersedia di PALAPA BOLA :
BCA | Mandiri | BNI | BRI | Danamon | CIMB Niaga
TESTIMONI : http://www.palapabolalounge.com/
DAFTAR SEKARANG : WWW(.)bolapalapa(.)NET
WA : +855 96 247 4901
-Bonus Deposit 15% Setiap Hari Bebas Klaim
-Cashback Up To 15%
-Bonus Refferal Seumur Hidup
-Dapatkan panduan bermain terbaik bersama kami
Aneka jenis permainan slot online dapat dimainkan setiap hari segera daftar dan menjadi member setia doyan303. http://149.28.158.118/
ReplyDeletedapatkan prediksi pasaran togel online terpopuler dan akurat hanya di website terbaik kami http://149.28.142.155/
ReplyDeleteWOW! That's amazing, what a great job! By the way, if you want to buy cheap SWTOR Credits you should go to IGGM.com
ReplyDeletepastikan anda mendapat kemenangan anda di mega888 rasmi dan dipercayai http://mega888user.com
ReplyDeleteMudahnya Withdraw Situs Terpercaya
ReplyDeleteSitus Slot Online Terpercaya
Mudahnya Deposit Situs Terpercaya
Freebet Gratis Tanpa Deposit
Bomjudi Situs Winrate Terbesar
Agen Sbobet Terpercaya
Link Alternatif Arenawin
Mudahnya Withdraw Situs Terpercaya
ReplyDeleteSitus Slot Online Terpercaya
Mudahnya Deposit Situs Terpercaya
Freebet Gratis Tanpa Deposit
Bomjudi Situs Winrate Terbesar
Agen Sbobet Terpercaya
Link Alternatif Arenawin
Bosan di rumahaja? Gabung sekarang dan menangkan jutaan rupiahnya Bersama kami :)
ReplyDeletePelayanan CS Fast Respon 24 Jam Non-Stop, Hubungi customer service kami :
WA : +85516326756
IG : @ligautama_win
Chat message
Mengenai pengeluaran SGP, Publishan http://pengeluaransgp88.com terbukti akurat
ReplyDeletedapatkan datahk terakurat di permaisuri4d. gabung dan main bersama kami http://139.180.185.61/
ReplyDeletekeluaran hongkong pastikan anda tidak kecewa dengan hasil prediksinya http://keluaranhongkong88.com/
ReplyDeletejangan lewatkan permaian togel di keluaran sgp yang bonafit http://keluaransgp88.com/
ReplyDeleteAyo bergabung dan bermain di situs terpercaya bersama aku di angkasa bola. untuk semua permainan^_^ kunjungi link resmi kami di www,vipiangkasabola,com Wa Resmi kami +6287775473234
ReplyDeleteMega Bonus Yang Tersedia
-BONUS DEPOSIT HARIAN 10%
-BONUS REFFERAL SEUMUR HIDUP 2.5%
-BONUS ROLLINGAN 0.8%
-BONUS CASHBACK 5-15%
#angkasabola #bonusdepo #bonusnewmember #cashback #seriea #laliga #premierleague #epl #bundesliga #ligue1
#prediksibola #jadwalbola #mixparlay #situsaman #situsterpercaya #prediksijitu #pedjoeangprediksi #situsbola #jackpot
#uefa #beritabola #bolaindonesia #sepakboladunia #beritabolaterbaru #timnasindonesia #koln #dortmund
sertai dan bermain dengan kami di mega888. laman web malaysia terbaik buat masa ini https://mega888online.com
ReplyDeleteMEJAQQ: AGEN JUDI POKER DOMINOQQ BANDARQ ONLINE TERBESAR DI ASIA
ReplyDeleteMEJAQQ
BANDARQ ONLINE
SITUS BANDARQ
DAFTAR MEJAQQ
Nama:::::::::::::::::::::::::::[Queen Jamillah]
ReplyDeleteNegara:::::::::::::::::::::::::::::[Indonesia]
Jumlah:::::::::::::::::::[Rp.9,8 miliar]
Alamat::::::::::::::::::::[Surabaya]
W/A:::::::[+6287818697754]
☎::::::[+6287818697754]
e_mail:::::::::::::::::[queenjamillah09@gmail.com]
Teman-teman orang Indonesia Nama saya Jamiilah saya seorang muslim jika Anda membaca blog selama dua sampai tiga tahun sekarang Anda akan menemukan bahwa saya telah membuat beberapa kesaksian mengenai saya mendapatkan pinjaman dari Bunda Iskandar dan saya memang sangat senang karena memberi tahu semua orang bahwa ibu Iskandar memang pemberi pinjaman yang sangat tulus dan juga saya dapat membuktikan fakta bahwa begitu banyak pelanggan juga telah mendapatkan pinjaman yang benar dari ibu selama bertahun-tahun melalui saya dan saya sangat senang untuk itu [Kesaksian terbaru sekarang adalah bahwa suami saya harus menyusun rencana mendirikan perusahaan mencuri di (Surabaya))))))) sehingga dia juga dapat memiliki akses ke bisnis yang lebih dan lebih berorientasi pada keuntungan yang melibatkan capaital yang sangat besar sehingga saya harus menghubungi Ibu bahkan ketika saya belum menyelesaikan cicilan bulanan terakhir saya sehingga ibu setuju untuk meminjamkan saya dan suami saya karena rencana bisnisnya berorientasi pada keuntungan dan kami harus mengajukan pinjaman sebesar (((Rp. 9,8 miliar) sehingga dana untuk proyek tersebut akan menjadi e Cukup mengejutkan kami, pinjaman saya disetujui oleh manajemen dalam waktu beberapa jam dan setelah beberapa waktu transfer berhasil dilakukan dengan gangguan dari OJK atau lembaga pengatur keuangan lainnya]
Ibu Iskandar tidak pernah menipu siapa pun atas uangnya,
Ibu memang pemberi pinjaman yang sangat tulus
Perusahaan Induk terdaftar di OJK jadi jangan takut
Ibu Iskandar punya catatan bagus dalam meminjamkan
Tarifnya sangat bersahabat dibandingkan dengan Bank
Minimum (Rp.100juta)))))
Maksimum (((((Rp.100billion)
Detail Kontak Perusahaan:
e_mail:::[[iskandalestari.kreditpersatuan@gmail.com]]]
COMPANY::::::::::::[Iskandar Lestari Loan Company]]]
Buruan daftar di LIGA IDOLA karena merupakan SITUS dengan TINGKAT KEMENANGAN TERTINGGI. Minimal deposit 10.000 . Join dan klaim bonus new member 300.000 sekarang juga
ReplyDeleteWA: +6281361312117
FB: PARLAY MANIA
Nama:::::::::::::::::::::::::::[Queen Jamillah]
ReplyDeleteNegara:::::::::::::::::::::::::::::[Indonesia]
Jumlah:::::::::::::::::::[Rp.9,8 miliar]
Alamat::::::::::::::::::::[Surabaya]
W/A:::::::[+6287818697754]
☎::::::[+6287818697754]
e_mail:::::::::::::::::[queenjamillah09@gmail.com]
Teman-teman orang Indonesia Nama saya Jamiilah saya seorang muslim jika Anda membaca blog selama dua sampai tiga tahun sekarang Anda akan menemukan bahwa saya telah membuat beberapa kesaksian mengenai saya mendapatkan pinjaman dari Bunda Iskandar dan saya memang sangat senang karena memberi tahu semua orang bahwa ibu Iskandar memang pemberi pinjaman yang sangat tulus dan juga saya dapat membuktikan fakta bahwa begitu banyak pelanggan juga telah mendapatkan pinjaman yang benar dari ibu selama bertahun-tahun melalui saya dan saya sangat senang untuk itu [Kesaksian terbaru sekarang adalah bahwa suami saya harus menyusun rencana mendirikan perusahaan mencuri di (Surabaya))))))) sehingga dia juga dapat memiliki akses ke bisnis yang lebih dan lebih berorientasi pada keuntungan yang melibatkan capaital yang sangat besar sehingga saya harus menghubungi Ibu bahkan ketika saya belum menyelesaikan cicilan bulanan terakhir saya sehingga ibu setuju untuk meminjamkan saya dan suami saya karena rencana bisnisnya berorientasi pada keuntungan dan kami harus mengajukan pinjaman sebesar (((Rp. 9,8 miliar) sehingga dana untuk proyek tersebut akan menjadi e Cukup mengejutkan kami, pinjaman saya disetujui oleh manajemen dalam waktu beberapa jam dan setelah beberapa waktu transfer berhasil dilakukan dengan gangguan dari OJK atau lembaga pengatur keuangan lainnya]
Ibu Iskandar tidak pernah menipu siapa pun atas uangnya,
Ibu memang pemberi pinjaman yang sangat tulus
Perusahaan Induk terdaftar di OJK jadi jangan takut
Ibu Iskandar punya catatan bagus dalam meminjamkan
Tarifnya sangat bersahabat dibandingkan dengan Bank
Minimum (Rp.100juta)))))
Maksimum (((((Rp.100miliar)
Detail Kontak Perusahaan:
e_mail:::[[iskandalestari.kreditpersatuan@gmail.com]]]
COMPANY::::::::::::[Iskandar Lestari Loan Company]]]
Nama:::::::::::::::::::::::::::[Queen Jamillah]
ReplyDeleteNegara:::::::::::::::::::::::::::::[Indonesia]
Jumlah:::::::::::::::::::[Rp.9,8 miliar]
Alamat::::::::::::::::::::[Surabaya]
W/A:::::::[+6287818697754]
☎::::::[+6287818697754]
e_mail:::::::::::::::::[queenjamillah09@gmail.com]
Teman-teman orang Indonesia Nama saya Jamiilah saya seorang muslim jika Anda membaca blog selama dua sampai tiga tahun sekarang Anda akan menemukan bahwa saya telah membuat beberapa kesaksian mengenai saya mendapatkan pinjaman dari Bunda Iskandar dan saya memang sangat senang karena memberi tahu semua orang bahwa ibu Iskandar memang pemberi pinjaman yang sangat tulus dan juga saya dapat membuktikan fakta bahwa begitu banyak pelanggan juga telah mendapatkan pinjaman yang benar dari ibu selama bertahun-tahun melalui saya dan saya sangat senang untuk itu [Kesaksian terbaru sekarang adalah bahwa suami saya harus menyusun rencana mendirikan perusahaan mencuri di (Surabaya))))))) sehingga dia juga dapat memiliki akses ke bisnis yang lebih dan lebih berorientasi pada keuntungan yang melibatkan capaital yang sangat besar sehingga saya harus menghubungi Ibu bahkan ketika saya belum menyelesaikan cicilan bulanan terakhir saya sehingga ibu setuju untuk meminjamkan saya dan suami saya karena rencana bisnisnya berorientasi pada keuntungan dan kami harus mengajukan pinjaman sebesar (((Rp. 9,8 miliar) sehingga dana untuk proyek tersebut akan menjadi e Cukup mengejutkan kami, pinjaman saya disetujui oleh manajemen dalam waktu beberapa jam dan setelah beberapa waktu transfer berhasil dilakukan dengan gangguan dari OJK atau lembaga pengatur keuangan lainnya]
Ibu Iskandar tidak pernah menipu siapa pun atas uangnya,
Ibu memang pemberi pinjaman yang sangat tulus
Perusahaan Induk terdaftar di OJK jadi jangan takut
Ibu Iskandar punya catatan bagus dalam meminjamkan
Tarifnya sangat bersahabat dibandingkan dengan Bank
Minimum (Rp.100juta)))))
Maksimum (((((Rp.100billion)
Detail Kontak Perusahaan:
e_mail:::[[iskandalestari.kreditpersatuan@gmail.com]]]
COMPANY::::::::::::[Iskandar Lestari Loan Company]]]
'SahabatQQ: Agen DominoQQ Agen Domino99 dan Poker Online Aman dan Terpercaya
ReplyDeleteWebsite SahabatQQ
WA 1 : +855887159498
WA 2 : +855972076840
Telegram 1 :+85515769793
Telegram 2 : +855972076840
LINE : SAHABATQQWIN
FACEBOOK : SahabatQQ Reborn
Agen Domino99
'
Nama:::::::::::::::::::::::::::[Queen Jamillah]
ReplyDeleteNegara:::::::::::::::::::::::::::::[Indonesia]
Jumlah:::::::::::::::::::[Rp.9,8 miliar]
Alamat::::::::::::::::::::[Surabaya]
W/A:::::::[+6287818697754]
☎::::::[+6287818697754]
e_mail:::::::::::::::::[queenjamillah09@gmail.com]
Teman-teman orang Indonesia Nama saya Jamiilah saya seorang muslim jika Anda membaca blog selama dua sampai tiga tahun sekarang Anda akan menemukan bahwa saya telah membuat beberapa kesaksian mengenai saya mendapatkan pinjaman dari Bunda Iskandar dan saya memang sangat senang karena memberi tahu semua orang bahwa ibu Iskandar memang pemberi pinjaman yang sangat tulus dan juga saya dapat membuktikan fakta bahwa begitu banyak pelanggan juga telah mendapatkan pinjaman yang benar dari ibu selama bertahun-tahun melalui saya dan saya sangat senang untuk itu [Kesaksian terbaru sekarang adalah bahwa suami saya harus menyusun rencana mendirikan perusahaan mencuri di (Surabaya))))))) sehingga dia juga dapat memiliki akses ke bisnis yang lebih dan lebih berorientasi pada keuntungan yang melibatkan capaital yang sangat besar sehingga saya harus menghubungi Ibu bahkan ketika saya belum menyelesaikan cicilan bulanan terakhir saya sehingga ibu setuju untuk meminjamkan saya dan suami saya karena rencana bisnisnya berorientasi pada keuntungan dan kami harus mengajukan pinjaman sebesar (((Rp. 9,8 miliar) sehingga dana untuk proyek tersebut akan menjadi e Cukup mengejutkan kami, pinjaman saya disetujui oleh manajemen dalam waktu beberapa jam dan setelah beberapa waktu transfer berhasil dilakukan dengan gangguan dari OJK atau lembaga pengatur keuangan lainnya]
Ibu Iskandar tidak pernah menipu siapa pun atas uangnya,
Ibu memang pemberi pinjaman yang sangat tulus
Perusahaan Induk terdaftar di OJK jadi jangan takut
Ibu Iskandar punya catatan bagus dalam meminjamkan
Tarifnya sangat bersahabat dibandingkan dengan Bank
Minimum (Rp.100juta)))))
Maksimum (((((Rp.100 miliar)
Detail Kontak Perusahaan:
e_mail:::[[iskandalestari.kreditpersatuan@gmail.com]]]
COMPANY::::::::::::[Iskandar Lestari Loan Company]]]
dragonball evolution
ReplyDeletedragonball evolution full movie
dragonball evolution 2
http://vivalahova.com/
dragonball evolution cast
dragonball evolution movie
dragonball evolution filmyzilla
dragonball evolution watch online
dragonball evolution movie download
dragonball evolution full movie online
dragonball evolution all parts
dragonball evolution actress
dragonball evolution amazon prime
dragonball evolution actress name
dragonball evolution apology
dragonball evolution actors
dragonball evolution apk
dragonball evolution age rating
dragonball evolution bulma
dragonball evolution box office
dragonball evolution budget
dragonball evolution blu ray
dragonball evolution booster box
dragonball evolution bad
dragonball evolution bg audio
dragonball evolution behind the scenes
dragonball evolution chi chi
dragonball evolution cast names
dragonball evolution codes
dragonball evolution chi chi actress
dragonball evolution codes roblox
dragonball evolution characters comparison
dragonball evolution creator
dragonball evolution download
dragonball evolution dual audio
dragonball evolution dual audio 720p
dragonball evolution download full movie
dragonball evolution dual audio 480p
dragonball evolution dual audio 480p movie download
dragonball evolution director
dragonball evolution dvd
dragonball evolution ending
dragonball evolution english full movie
dragonball evolution emmy rossum
dragonball evolution end credits
dragonball evolution english google docs
dragonball evolution everything wrong
dragonball evolution english
dragonball evolution ernie hudson
dragonball evolution full movie in hindi download filmyzilla
dragonball evolution full movie watch online
dragonball evolution full movie download in hindi 480p
dragonball evolution full movie free
dragonball evolution full movie in hindi dubbed filmyzilla
dragonball evolution full movie in english
instagram
ReplyDeleteinstagram login
http://eshbrooklyn.com
instagram video download
instagram download
instagram reels download
instagram reels video download
instagram story saver
instagram bio for girls
instagram app
instagram account delete
instagram autofree.in
instagram apk
instagram account
instagram account hacked
instagram account delete permanently
instagram auto liker
instagram bio
instagram bio for boys
instagram bio in punjabi
instagram bio in punjabi for girl
instagram bio for boys attitude
instagram background
instagram blue tick copy
instagram captions
instagram captions for boys
instagram captions for girls
instagram captions in punjabi
instagram create new account
instagram customer care
instagram change password
instagram customer service number
instagram dp
instagram download video
instagram delete account
instagram download for pc
instagram download apk
instagram dp for girls
instagram delete my account permanently
instagram email
instagram emoji
instagram email id
instagram engagement checker
instagram extension for chrome
instagram engagement calculator
instagram email address
instagram earn money
instagram followers
instagram followers free
instagram fonts
instagram followers increase
instagram forgot password
instagram followers hack
instagram fake followers
instagram font style
pastikan anda bergabung dan bermain di situs data sgp resmi dan terpercaya. kunjungi kami di http://128.199.248.147/
ReplyDeleteagen situs terpercaya hkpools memberikan jaminan kemenangan. http://149.28.134.158/
ReplyDeletebandar togel online yang menjadi favorit dalam kingdomgrup adalah cabang kinghorsetoto bosku http://128.199.187.54/
ReplyDeleteKUNJUNGI SALAH SATU SITUS MENARIK PKVGAMES KAMI:
ReplyDeleteDOMINO99
ADUQ
Berikut HOT PROMO Yang Masih Berlaku Di Angkasa Bola, Antara Lain :
ReplyDelete- Bonus Deposit Harian 10% (Maksimal Bonus 100,000) Minimal TO 2x
- Bonus Cashback Mingguan Di Sportbook 5% - 15%
- Bonus Cashback Slot 5% - 15%
- Bonus Refrensi 2,5% Seumur Hidup Di Permainan Sportbook
- Bonus Rollingan Casino 0.8%
- Bonus Rollingan Referral 0.1%
- Bonus Rolllingan Poker 0.2%
Bosan di rumahaja? Gabung sekarang dan menangkan jutaan rupiahnya Bersama kami :)
ReplyDeletePelayanan CS Fast Respon 24 Jam Non-Stop, Hubungi customer service kami :
WA : +85516326756
IG : @ligautama_win
agen pragmatic online bandar togel 98toto terkeceh
ReplyDeleteSlot Online KINGDOM paling gokill
ReplyDeletepaket lengkap hanya ada di dominoqq
ReplyDeletehttp://170.187.227.99/
terbatas!!!
ReplyDeletesegeralah kunjungi situs web kami!
bonus di depan mata.
http://170.187.227.99/
https://199.192.24.215/
ReplyDeleteBermain di situs terbaik dan terpercaya hanya di slot pulsa.
situs permainan kartu Online terlengkap dan terpercaya dengan server kualitas terbaik dan tercepat serta bonus kemenangan jutaan rupiah MurahQQ
ReplyDelete
ReplyDeleteGreat Information. I like the way you explain the article. Thank you for sharing this information. https://hairsaloninsandiego.com/
pokerbola adalah situs mpo slot terbaik.
ReplyDeletehttp://149.28.143.94/
THANK FOR NICE INFORMATION, VISIT OUR WEBSITE : HTTPS://UHAMKA.AC.ID/
ReplyDeletebergabunglah disitus taruhan bola online, terupdate dan terpercaya.
ReplyDeletePerbaiki dan lakukan pengecekan mesin secara berkala di Bengkel Motor Bekasi silahkan hubungi kami melalui website http://www.bengkelmotorbekasi.com
ReplyDeleteSlotsaja.com Yang Merupakan Agen togel terbesar dan terpercaya menyediakan Togel online, Slot Online Terpercaya di asia hadir untuk anda semua dengan permainan permainan menarik dan bonus menarik untuk anda semua.
ReplyDeleteBonus yang kami berikan :
* BONUS NEW MEMBER 5% (Langsung masuk ke Akun)
* Bonus Harian 2%
* Bonus Cashback slot 3%
* Cashback togel bulanan 2%
* Bonus Casino 5%
Sebagai bandar taruhan togel online singapore terpercaya sejak 2018 kami menyediakan 10 pasaran togel online terbaik untuk anda. Dengan diskon di setiap pemasangan angka 4D: 66%, 3D: 59%, 2D: 29% terbesar untuk anda !
Info lebih lanjut kunjungi :
Whatsapp : +6282141143597
Ayo daftar : www.slotsaja.com
Alternatif : 157.230.41.10
Telegram : t.me/slotsaja
Bukti Pembayaran : facebook.com/slotsaja808
SLOTSAJA: SITUS BANDAR SLOT E-WALLET OVO, DANA, GOPAY, LINKAJA PERTAMA DI INDONESIA !
ReplyDeleteYang Merupakan Situs Bandar Slot Deposit via DANA pertama di Asia Hadir Untuk Anda Semua Dengan Games dan Bonus Yang Menarik!
Bonus yang Kami Berikan di SLOTSAJA :
* BONUS NEW MEMBER 5% (Langsung masuk ke Akun)
* Bonus Harian 2%
* Minimal Deposit 20,000
* Minimal Withdraw 20,000
* Bonus Cashback slot 3%
* Deposit via E-Money, Pulsa TELKOMSEL
* Cashback togel bulanan 2%
* Bonus Casino 5%
* Pelayanan Bank dan Livechat 24 jam
* Tersedia Dalam Aplikasi Android atau IOS.
Mau dapet duit tanpa kerja? Bisa banget!
Caranya? Buruan Kunjungi Sekarang Juga ^.^
Info Lebih Lanjut hubungi kami :
Whatsapp : +6282141143597
Ayo daftar : www.slotsaja.com
Alternatif : 157.230.41.10
Telegram : t.me/slotsaja
Bukti Pembayaran : facebook.com/slotsaja808
pastkan anda memilih situs mpo slot.
ReplyDeletehttp://139.162.43.253/
"MITRA77
ReplyDeleteMitra77
mitra77
MITRA77"
situs bandarqq Dan Qiu Qiu online terbaik saat ini.
ReplyDeletehttp://45.77.174.216/
Apk Sv388 Sabung Ayam Terbaik
ReplyDeleteInformasi Sabung Ayam Sv388
Sabung Ayam Sv388 Terbaru Hari Ini
Judi Sabung Ayam Sv388 Terbaru Hari Ini
Tradisi Sabung Ayam Sv388
Sabung Ayam Sv388 Taji
Daftar Sv388 Sabung Ayam Terbaru 2022
Agen Sv388
Judi Sv388
sv388 live
situs slot pulsa menghadirkan berbagai permainan populer. gabung dan main bersama kami disitus terbaik kami
ReplyDeleteSv388 Wala Meron
ReplyDeleteWala Meron Sv388
Judi Sv388
Link Sv388
daftar sv388
Judi Sv388
Daftar Sv388
Agen Sv388
Sv388
situs Prediksi togel online terbaik. buruan gabung sekarang di https://autojp4d.com/
ReplyDeleteSitus penyedia rtp slot online gacor yang mudah maxwin dan agen judi bola terpecaya dan mudah cair hanya disini
ReplyDeletepromo situs judi online
ReplyDeletepromo judi online terbaru
promo slot terbaru
situs judi online terpercaya
situs judi slot terpercaya
Agen Slot Online
situs slot
Liveslot
mitra77
Mitra77
MITRA77
Slot gacor
link server jakarta
ReplyDeleteLink server jakarta
Slot Gacor
Slot terpercaya
situs slot
info slot gacor
daftar mitra77
mitra77
Mitra77
suhu jp
situs infini gacor
ReplyDeleteSitus infini gacor
SITUS INFINI GACOR
link slot
server asia
MITRA77
mitra77
Mitra77
suhu jp
Suhu Jp
SUHU JP
During heavy rainfall, my basement used to get flooded until I got a sump pump installed by this service. It has been a game-changer! No more worries about water damage. Thank you for providing such a reliable solution. KM Vallis Plumbing & Sewer
ReplyDeleteJangan gegabah saat bermain pasaran bola di agen Ibcbet. Tentukan strategi yang matang agar kemenangan selalu menghampiri Anda.
ReplyDeleteProvider idn slot sudah memiliki jutaan player aktif yang bermain slot. Sebelum bermain idn slot dengan uang asli, mereka mencoba fasilitas dan layanan terbaik demo idn slot.
ReplyDeleteGunakan fasilitas dan layanan terbaik dari ion casino untuk mendapat peluang keuntungan dan kemenangan besar.
ReplyDeleteThis article gives the light in which we can observe the reality.
ReplyDeleteThis is very nice one and gives indepth information.
ReplyDeleteThanks for this nice article.
ReplyDeleteI found your this post while searching for some related information on blog search.
ReplyDeleteSalam untuk semua warga Indonesia, nama saya Yeyes Ristintares tolong, saya ingin membagikan kesaksian hidup saya di sini di platform ini untuk semua warga Indonesia saya untuk sangat berhati-hati dengan pemberi pinjaman pinjaman di internet, Allah sangat mendukung saya melalui jalan yang baik. ibu Ny. Helen Wilson. Setelah beberapa periode mencoba untuk mendapatkan pinjaman dari lembaga keuangan, dan ditolak, saya memutuskan untuk mendaftar melalui pinjaman online tetapi saya tertipu dan saya kehilangan lebih dari 32 juta Rupiah dengan pemberi pinjaman yang berbeda setelah membayar beberapa biaya dan tidak mendapatkan pinjaman. meminjamkan. Saya menjadi sangat putus asa dalam mendapatkan pinjaman, jadi saya mendiskusikannya dengan seorang teman saya yang kemudian memperkenalkan saya kepada Ibu Helen Wilson, pemberi pinjaman pinjaman di perusahaan, jadi teman saya meminta saya untuk melamar dari ibu Helen, jadi saya mengumpulkan keberanian dan menghubungi Ibu Helen.
ReplyDeleteSaya mengajukan pinjaman 900 juta dengan tingkat bunga 2%, sehingga pinjaman disetujui tanpa tekanan dan semua pengaturan dilakukan pada transfer kredit, karena tidak memerlukan agunan dan jaminan untuk pinjaman transfer saya hanya diberitahu untuk mendapatkan sertifikat perjanjian lisensi aplikasi mereka untuk mentransfer kredit saya dan dalam waktu kurang dari 48 jam uang pinjaman telah disetorkan ke rekening bank saya.
Saya pikir itu lelucon sampai saya menerima telepon dari bank saya bahwa akun saya dikreditkan dengan jumlah 900 juta. Saya sangat senang akhirnya Allah menjawab doa saya dengan memesan pinjaman saya dengan pinjaman asli saya, yang memberi saya keinginan hati saya. Mereka juga memiliki tim ahli yang akan memberi tahu Anda tentang jenis bisnis yang ingin Anda investasikan dan bagaimana menginvestasikan uang Anda, sehingga Anda tidak akan pernah bangkrut lagi dalam hidup Anda. Semoga ALLAH memberkati Ibu Helen Wilson untuk membuat hidup saya mudah, jadi saya menyarankan siapa pun yang tertarik untuk mendapatkan pinjaman untuk menghubungi Ibu Helen melalui email: (helenwilson719@gmail.com)
Ada perusahaan palsu online lainnya yang menggunakan kesaksian saya untuk mencapai keinginan egois mereka, saya satu-satunya dengan kesaksian yang benar ini, harap berhati-hati dengan orang-orang ini. Akhirnya saya ingin berterima kasih kepada Anda semua karena telah meluangkan waktu untuk membaca kesaksian hidup saya yang sebenarnya tentang kesuksesan saya dan saya berdoa agar Allah melakukan kehendak-Nya dalam hidup Anda. Sekali lagi nama saya Yeyes Ristintares, Anda dapat menghubungi saya untuk informasi lebih lanjut melalui email saya: yristintares@gmail.com
shhuliing734gj
ReplyDeletegolden goose outlet
golden goose outlet
golden goose outlet
golden goose outlet
golden goose outlet
golden goose outlet
golden goose outlet
golden goose outlet
golden goose outlet
golden goose outlet
Tutorial “Headboard Shelf” di blog ini sangat menginspirasi! Ide membuat rak kecil di atas headboard tidak hanya praktis (memanfaatkan ruang yang sebelumnya kosong) tapi juga menambah estetika kamar. Penjelasan langkah-demi-langkahnya mudah diikuti untuk siapa pun yang suka proyek DIY.
ReplyDeleteindocair
indocair
indocair
indocair
indocair
indocair
indocair
Fortunabola adalah destinasi bagi mereka yang ingin menikmati slot online gacor sekaligus taruhan olahraga. Melalui link daftar resmi, pemain bisa langsung bergabung dan menikmati permainan dengan akses aman. Koleksi slot populer menghadirkan keseruan, sementara layanan taruhan bola Sbobet lengkap dengan mix parlay menawarkan pengalaman berbeda. Fortunabola menekankan kualitas layanan, keamanan, dan stabilitas, sehingga semua pemain merasa nyaman. Tidak heran jika Fortunabola terus menjadi portal hiburan digital terpercaya bagi banyak orang. https://online.27stars.id/
ReplyDelete888vipbet menyajikan berita olahraga murah bagi pembaca yang ingin efisien. Kamu bisa tahu update skor, klasemen, dan jadwal turnamen secara real-time. Tanpa biaya langganan, kamu tetap mendapat berita terkini setiap hari. 888vipbet hadir untuk pecinta olahraga yang cerdas dan hemat. https://888vipbet.27stars.id/
ReplyDeleteThe online betting industry is growing rapidly as more users shift toward digital sports and gaming platforms. To get started, the first step is usually choosing a reliable Online Cricket Id Provider who can create and activate your verified account.
ReplyDelete